Raising chickens is rewarding – fresh eggs, backyard entertainment, and a sustainable food source. But keeping them safe and happy can be challenging. A chicken tractor, a mobile coop, simplifies chicken keeping, making it more efficient and enjoyable. This guide, packed with inspiring chicken tractor pictures, shows you how to build your own in a weekend! For even more inspiration, check out these aluminum chicken tractor designs.
Designing Your Chicken Paradise: Size and Style
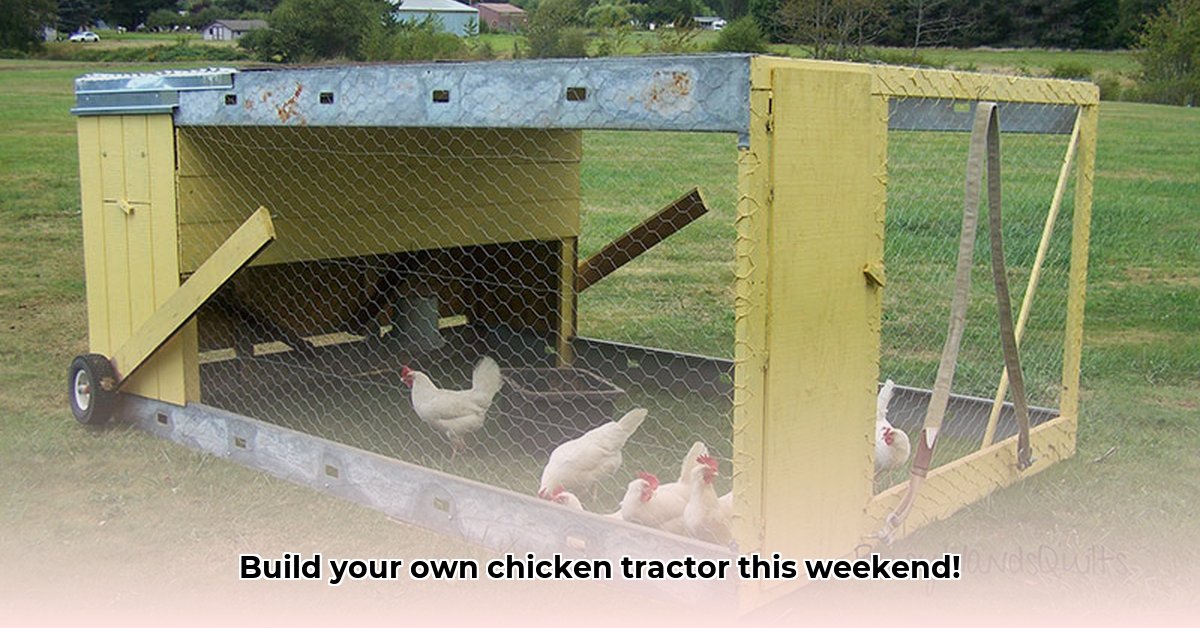
Before construction, plan your design. The number of chickens dictates the size. Overcrowding leads to stress and unhealthy birds. Many designs exist – simple A-frames, more complex multi-room structures, and even wheeled models. Browse chicken tractor pictures for ideas! Ensure ample space – at least 4-6 square feet per chicken is recommended, more if possible.
Consider ease of movement. A lightweight tractor is easier to relocate, maximizing foraging opportunities. Think about cleaning too; easy access and design features will make cleanup a breeze. Prioritizing clean coop maintenance is essential for healthy hens.
Here’s a sizing guideline:
| Chickens | Minimum Floor Space (sq ft) | Recommended Floor Space (sq ft) |
|---|---|---|
| 4-6 | 24-36 | 40-60 |
| 7-10 | 35-50 | 70-100 |
| 11-15 | 55-75 | 110-150 |
Gathering Your Supplies: The DIY Checklist
Building a chicken tractor is a manageable DIY project. Chicken tractor pictures offer visual inspiration for material choices and design aesthetics. Your supply list likely includes:
- Wood: 2x4s and 2x6s are popular, but reclaimed wood adds character and sustainability.
- Hardware Cloth: Crucial for predator protection; choose sturdy material.
- Wire Mesh/Netting: For ventilation and added security.
- Hinges: For doors and access panels.
- Wheels (Optional but Recommended): For easy relocation.
- Fasteners: Screws and nails, plus any specialized hardware.
Building Your Mobile Coop: A Step-by-Step Guide
Let's build! These steps are a general guide; adapt them to your specific design. Take lots of pictures – they'll be invaluable later!
- Frame Construction: This is the foundation. Chicken tractor pictures will visually guide you in building a sturdy frame using the chosen wood.
- Floor Construction: Ensure it's strong, easy to clean, and slightly sloped for drainage.
- Wall Construction: Secure hardware cloth firmly to the frame to exclude predators.
- Roof Construction: A sturdy roof protects chickens from the elements.
- Door and Access Point Installation: Easy access is crucial for cleaning, feeding, and egg collection.
- Wheel Attachment (if applicable): Mobility simplifies pasture rotation.
Keeping Your Chickens Safe: Predator Defense and Weather Protection
A good chicken tractor is a fortress against predators. Chicken tractor pictures often highlight protective features like:
- Reinforced hardware cloth or multiple layers to deter determined predators.
- Secure latches and locking mechanisms to prevent animals from entering.
- Elevated flooring to deter digging predators. Electric poultry netting around the base provides extra protection.
Weather protection is also vital. Ventilation prevents overheating in summer. For winter, consider insulation (extra roofing or other techniques).
Maintaining Your Mobile Chicken Haven: Long-Term Care
Regular cleaning is key. Inspect your tractor for damage and make necessary repairs. Consider adding nesting boxes or roosting bars for increased comfort. Upgrades like added insulation or run extensions enhance the coop over time. Your chicken tractor pictures will serve as a guide for future modifications.
Building a chicken tractor is a creative and rewarding endeavor. It enhances your chickens' lives and delivers the satisfaction of a successful DIY project. Use the chicken tractor pictures as inspiration and enjoy the process!
How to Winterize a Chicken Tractor for Cold Climates
Winterizing your chicken tractor ensures your flock remains healthy and productive throughout cold weather. Simple modifications transform it into a cozy winter haven. Prioritizing wind protection, moisture control, and supplemental warmth is essential.
Preparing for Winter's Chill
Assess your tractor's sturdiness and identify any drafts. These issues must be addressed before insulation.
Windbreaks: Essential Protection
Wind increases heat loss and can cause frostbite.
- Tarps: Securely attach heavy-duty tarps to the windward side, overlapping edges.
- Straw Bales: Provide insulation and wind shielding.
- Fencing: Create a windbreak around the tractor.
Moisture Management: Keeping it Dry
Prevent damp bedding, a breeding ground for diseases and frostbite.
- Elevated Floor: Raise the tractor off the ground to improve airflow and reduce moisture.
- Deep Litter Method: Build up a deep layer of bedding; decomposition generates heat.
- Ventilation: Balance warmth with adequate airflow to avoid moisture buildup.
Supplemental Insulation (If Needed)
In extremely cold climates, consider:
- Straw Bale Walls: Highly effective and environmentally friendly.
- Plastic Sheeting: Add an extra layer of insulation to exterior walls.
- Recycled Materials: Repurpose safe materials (avoid fire hazards).
Monitoring and Maintenance
Regularly check temperatures and your birds' condition. Adjust ventilation as needed. Preventative measures minimize potential problems.